
In short, what you will discover in this article: a clear and comprehensive guide to understand how eSIM works, check your device compatibility, and follow precise steps on how to install an eSIM on iPhone, Android, or other devices. You will also learn how to troubleshoot common issues and secure your eSIM profile.
1. Introduction: What Is an eSIM and Why Use It
An eSIM is a SIM card embedded directly into your device, eliminating the need for a physical card. It simplifies managing multiple plans, makes traveling easier, and speeds up mobile service activation. Thanks to eSIM configuration on smartphones, you benefit from increased flexibility and save space in your phone.
2. Prerequisites Before Installation
2.1 Check Device Compatibility (Model and OS Version)
First, make sure your device is among the devices compatible with eSIM. The latest iPhones, certain Samsung models, Google Pixel, and recent tablets support this technology. Also, verify that your operating system is up to date (generally iOS 15+ or Android 10+).
2.2 Check Carrier Offer and Conditions (Activation, Costs, Portability)
Not all carriers yet offer eSIM-supporting operators. Find out about available plans, possible fees, and activation procedures. Some carriers require a QR code, others use a dedicated app. Number portability may also be supported.
2.3 Back Up Data and Prepare Wi-Fi Access
Before installing your eSIM, back up your important data. A stable Wi-Fi connection is often necessary to download and activate the eSIM profile. This avoids interruptions and eases the process.
3. Methods to Install an eSIM
3.1 Installation via QR Code (Detailed Steps with Notes for iOS/Android)
The most common method involves scanning a QR code provided by the carrier:
- Open your device's Settings.
- On iPhone: go to Cellular > Add Cellular Plan.
- On Android: go to Mobile Network > Add Plan.
- Scan the QR code with the camera.
- Follow the instructions to activate the plan.
This method is fast and avoids input errors. On iOS, activation confirmation might require a Wi-Fi connection. On Android, the path may vary slightly by brand.
3.2 Manual Installation (SMSC, Activation Code, Carrier Settings)
If you can't use a QR code, some carriers provide an activation code or settings to enter manually:
- Access the eSIM plan addition section.
- Choose manual installation.
- Enter the activation code or SMSC parameters provided.
- Confirm and wait for validation.
This method is less intuitive but useful if the QR code fails.
3.3 Activation via Carrier App (Typical Procedure)
More carriers offer activation through their mobile app:
- Download the carrier's official app.
- Log in to your customer account.
- Select the option to activate an eSIM.
- Follow the guided steps, often including a built-in scan or direct profile download.
This simplifies management and sometimes allows handling multiple eSIM profiles.
3.4 Transferring an eSIM from Another Device (Prerequisites and Steps)
To transfer an eSIM from an old device to a new one:
- Ensure both devices support eSIM transfer.
- On the old device, open eSIM settings and choose the transfer option.
- On the new device, follow the add plan process and accept the transfer.
- Confirm and activate the new eSIM.
This feature is particularly developed on iOS, enabling contactless migration.
4. Practical Cases by Platform
4.1 iPhone / iOS — Step-by-Step Path and Key Screenshots
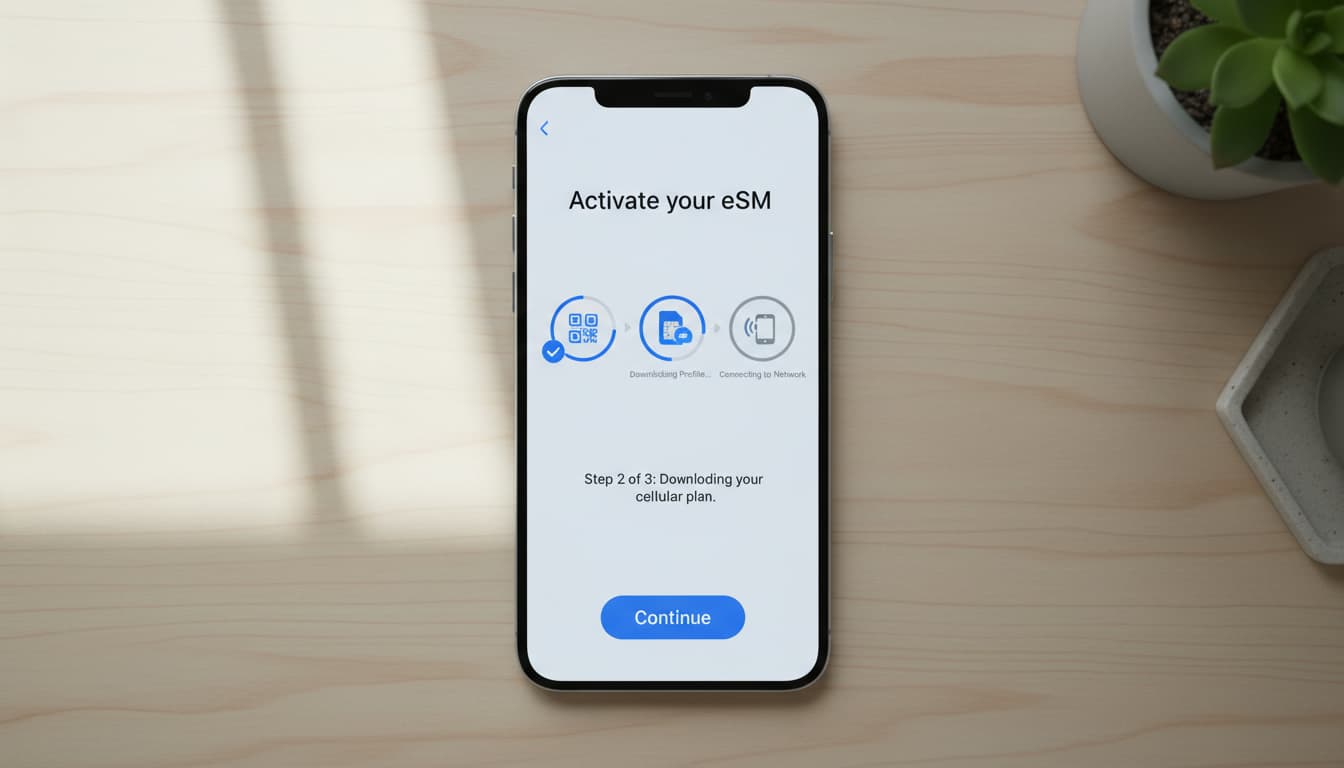
On iPhone (iOS 15+), the process is straightforward:
- Go to Settings > Cellular.
- Tap Add Cellular Plan.
- Scan the QR code or choose Transfer from iPhone.
- Activate the plan and configure options (primary line, secondary, data).
Apple recommends a stable Wi-Fi connection to avoid activation errors. For more details, the official Apple support provides a full guide.
4.2 Android (Samsung, Google Pixel, Others) — Notable Variations
On Android, menus vary by brand:
- Samsung: Settings > Connections > SIM card manager > Add mobile plan.
- Google Pixel: Settings > Network & Internet > SIM card > Add plan.
QR code scanning is often the preferred method. Some devices also allow installation via carrier app.
4.3 Smartwatches and Tablets — Specific Particularities
eSIM-compatible smartwatches and tablets follow similar procedures but with specific options in their settings. For example, the Apple Watch requires pairing with the iPhone to activate the eSIM. Always verify compatibility and manufacturer instructions.
5. Troubleshooting: Common Issues and Quick Fixes
5.1 QR Code Not Recognized / Activation Failure
- Check the QR code clarity.
- Ensure a stable Wi-Fi connection.
- Restart the device and retry.
- Contact your carrier if the problem persists.
5.2 eSIM Active but No Network / Roaming Errors
- Enable roaming in settings.
- Check network coverage.
- Delete and reinstall the eSIM profile if needed.
5.3 How to Safely Reinstall or Remove an eSIM
- To remove: Settings > Cellular > select the plan > Remove.
- To reinstall, use the QR code or carrier app.
- Always back up your data before making changes.
6. Security and Best Practices
6.1 Locking, Remote Deletion, eSIM Profile Management
Secure management of your eSIM is essential. Enable a passcode lock, use remote deletion options if the device is stolen, and limit the number of active profiles. This protects your data and your plan.
7. Practical Questions and Use Cases
7.1 eSIM for Travelers and Multiple Numbers
The eSIM facilitates managing multiple numbers, ideal for travelers. You can activate a local plan without physically swapping SIM cards, reducing roaming costs.
7.2 eSIM vs Physical SIM Comparison Based on Needs
- Advantages of eSIM: fast activation, multi-profiles, space-saving.
- Disadvantages: software dependency, limited compatibility.
- Physical SIM remains useful for older devices or resale situations.
8. How to Get an eSIM from Your Carrier (Typical Procedure)
- Contact your carrier or visit their website.
- Choose an eSIM-compatible plan.
- Receive a QR code or activation link.
- Follow installation steps based on your device.
- Activate and test the connection.
For a complete visual guide, Airalo's tutorial is an excellent resource.
9. Conclusion and Summary Checklist
To successfully install your eSIM, follow these key steps:
- Check device and carrier compatibility.
- Prepare a stable Wi-Fi connection and back up your data.
- Choose the installation method that fits (QR code, manual, app).
- Activate and configure your plan in settings.
- Test the connection and secure your eSIM profile.
By following this guide, you’ll avoid common mistakes and fully enjoy eSIM benefits.
To enhance your mobile experience, also discover how to manage secure communications with self-deleting messages on Skyda.co.
Discover now the best eSIM offers on Amazon to enjoy quick and reliable installation, and equip yourself with a high-performance VPN for a secure connection in all situations.